Saturday 15 February 2014

I've Been a Very Bad Blogger

Yikes! It's been almost 3 months since my last post. Oops! Christmas, New Year's Eve AND Valentine's Day have passed since then lmao!!

When I first started this blog, I was expecting to be posting a heck of a lot more than I have been. I think I may have underestimated how much really goes into maintaining a blog. I seem to favour Instagram over all other forms of social media in terms of posting about my nails.

At the beginning I was like "Yes! I'm gonna be able to post multiple pictures & blab on and on about my current mani & nobody can say anything about it!" That takes a lot of effort (to me) though. If I wanted to upload multiple pictures, I'd have to watermark multiple pictures, plus taking pictures of nails isn't as easy as it may seem (some of you already know this lol).

Seeing as it's a new year & everything, I'm going to try & up my blogging game, if only slightly.
I did just get a new job (YES!!!) so I'm not sure what my hours are like yet. In the meantime, here's what I think I'm going to: At the bare minimum, I think I'll post at least once a month, probably with a Monthly Mani Favourites post.

And as for right now, I'll post a couple (relatively) recent awesome manis!


This first one is from 6 weeks ago. My claws had grown back since the chop at the end of October.
Zoya Stevie, 2 coats, no top coat

This was the mani I did after my most recent chop (end of January). My first leopard print tips! This chop wasn't as short as the one in October. I had a crack in my middle finger from cleaning & felt like I wanted a change, so I chopped them off again, this time without a sad face haha.
L.A. Colors Fuel, 3 coats with top coat & leopard print

 Just a simple French manicure with a twist.
Sally Hansen Diamonds, 2 coats & China Glaze Ruby Pumps with top coat

These ones were pretty special to me. One of my best friends went to Jamaica for a week & I missed her dearly. I did a dedication manicure for her when she got home using a polish she'd given me.
Pure Ice China Girl, 2 coats with top coat & nail art using acrylic paint

Christina's committed herself to growing out her nails again & she's been doing amazingly! I used Nail Vinyls for the chevron tips, they're so amazing!!
Pure Ice Shell Pink, 2 coats with Quo Purple Passion tips with topcoat

See what I mean about Christina's nails? Holy length! And the leopard print? LOVE IT!!!
Sinful Colors Over It, 2 coats with topcoat & leopard print nail art

My first EVER glitter gradient!!!
Sinful Colors Endless Blue, 2 coats & Sally Hansen Mermaid's Tale
dabbed/sponged gradient with top coat

 And this is what's currently on my nails! These were the nails I did for Valentine's Day!
I also used the very awesome Nail Vinyls for this mani.
Gosh Classic Red, 3 coats & Zoya Storm for the tips with top coat

I guess that's it for now. I know my posts tend to be a bit lengthy haha. Hopefully I'll be posting a little more frequently.

Until then, ta ta for now!!

- Julez

Sunday 24 November 2013

Winter is Coming..

For a lot of people, winter is an awesome season, but not for me. I'm not very Canadian when it comes to our winters, too damn cold for me, haha!

Since coming back from my vacation I've been trying to only use polishes I bought while I was away. That's quite a feat seeing as I bought at least 50 bottles of polish lmao! October was Breast Cancer Awareness month & I did a few manicures to support that.


This one was actually done on my Cinderella hand & I painted the ribbon free hand & with my left hand haha. Turned out pretty well, I think.


This was my second Breast Cancer Awareness mani. A little simpler than my first one, but I loved it nonetheless. :)

Before I can post the pic of my final BCA mani, I have a sad story to tell.

While preparing to do the above manicure, I hit my ring finger nail on my lamp & ended up breaking the nail straight across the free edge, almost all the way. I was able to salvage it using the tea bag technique but unfortunately it didn't hold. I felt that trying to keep it patched would be a lot of additional work. I use pure acetone when I do my nails, and that disintegrates the fix & I didn't want to have to fix my nail each time I took off the previous mani. That being said, I chopped off my claws! :(


The final BCA mani I did almost two weeks after the chop, so my nails are longer than they were in this pic.


This one was my favourite of the lot. Love the neon & holographic combo!!

So because I haven't posted in quite a while, I'm going to warn you that this might become a bit of a lengthy post. I realize that it's almost the end of November, but I've been seriously slacking in terms of blogging. I think it's got something to do with how much effort it takes for me to organize all my photos (I take a LOT, who doesn't? haha) & get them from the correct folders on my phone to my computer.

Another reason I've been slacking a bit is because I got a job at LUSH earlier this month & I've been doing a whole bunch of research on the company, the products & the ingredients we use. It's such an amazing company. My friend Christina surprised me with these notes on her door on the day I announced that I got the job. Love her!!


Needless to say, I was super sad about having to chop off my nails, so I totally had to find the perfect colour to compliment my new nubbins. After seeing this colour all over Instagram & after seeing a sale for OPI polishes at Ulta while on vacation, I had to get it.


This gorgeous colour is OPI... Eurso Euro by OPI (obviously lol). It's a gorgeous dark blue that made me feel much better about my wittle nubbins haha.

So this year was my first year ever doing Hallowe'en nail art & this is what I decided on.


How cute is my little spider?!?!?! I was really happy with how these turned out. The orange polish was pretty awesome for being a Dollarama polish haha. I did both the spider and the web with acrylic paint.

I think this is going to be the last picture I put in this blog post. Like I mentioned earlier, I'm not at all a fan of winter nor the weather it brings. While everyone else is wearing all these fall/winter colours, I'm still rocking summer colours & neons. This mani is the perfect example.


This was my first time doing drip nail art. I think it turned out pretty decently. I used acrylic paint for the drips & I used a neon green for the tips. I also used striping tape for the tips, which is very unlike me. I don't like my French tips to be super straight like that, which is why I usually free hand them so they look more natural. It was late that night & I just couldn't be bothered to free hand it.

Welp, I think that's lengthy enough! Hope you enjoyed my nail art! :)

- Julez

Monday 21 October 2013

Sorry For The Hiatus :/


I know it's been almost a month since I last posted. I was on vacation for the first two weeks & since I've returned I just haven't had the time to sit down & write anything.

In my last post, I mentioned that my SD card was giving me problems. I think I've solved the problem, but I'll have to wait to find out. Once I get all the media from the card onto my laptop I'm going to format the card & see if that solves the problem I've been having.

I'm really excited to post more, I bought so much polish while I was on vacation haha!


Plus I won an awesome giveaway hosted by the equally awesome Jennifer @my_daily_mani.


8 Sinful Colors polishes, 8 striping tapes, 5 set of dual-ended dotting tools, rainbow file & buffing block

And just for fun, here's a few pics from my vacation. :)

Mosin-Nagant .30 Bolt Action Rifle
Venice Beach Boardwalk
Four Aces Movie Set
Four Aces Movie Set
Four Aces Movie Set
Kill Bill Church
Kill Bill Church
Hopefully I'll be able to make more frequent posts after I figure out the issues with my SD card & my laptop.

Ta ta for now! 

- Julez

Sunday 22 September 2013

Oh Bother!

It seems that my SD card is having some difficulties, that or my laptop just hates me, so this post isn't going to have many pictures this time. I think I forgot to unmount it before I removed it from my phone last time :(

Aaaaaanywho, I'm going on vacation on Tuesday for two weeks to visit family in California & I'm not sure if I'm going to be able to blog while I'm away or not. Although, I can guarantee that I'll be taking LOTS & LOTS of pictures (not just my nails haha) so I'll be able to upload those once I'm back home.

I'm suuuuper excited to go on vacation not only because I get to visit my family, but also because I bought both of Color Club's Halo Hues collections AND I have 4 Zoyas waiting for me there already. When Zoya was having their BOGO sale I figured it was high time to get me some Pixie Dusts, so I bought 3 (Liberty, Carter & Stevie) & also picked up their polish called Julie, because it's only like the best name ever!
Liberty
Swatch credit to Chalkboard Nails
Carter
Swatch credit to Chalkboard Nails
Stevie
Swatch credit to Chalkboard Nails
Julie
Swatch credit to Scrangie
Color Club Halo Hues Collections
Photo credit to Universal Nail Supplies

I did some mad research the other day on different places that sell polish in the area where I'll be staying. I even mapped it all out & found out which stores were close to each other so that we wouldn't have to go driving all around SoCal hahaha.

When I get home I'm definitely going to need a nail polish rack. The basket I use to store my polishes in now is full & I don't want to pile them on top of each other. At the bare minimum I'm coming back with 16 new polishes, so I need to get a rack. I found a tutorial on YouTube for a DIY: Nail Polish Wall Rack, so that's what I plan on doing.

I can't explain how stoked I am to finally own those holographic nail polishes!! I remember the first time I saw them on Instagram that I knew I had to have them. I have one linear holographic polish already but I don't use it because there's not a whole lot left :( I also have China Glaze's Fairy Dust but it's a scattered holographic, that's not to say I don't adore it 'cause I do, but it isn't linear lol.

Welp, I guess that's it for now. I'll see if I can get a post or two in while I'm away. Until then, folks!

Wednesday 11 September 2013

Christina's Nail Rehab!!


I was going to put this in my previous post but decided to give it its own post :)

A little over a month ago, my friend Christina asked me to help her to start growing out her nails. She was (key word) a nail biter & because of that, she used to get fake nails which do more damage than good. She got rid of the fake nails & set her mind to stopping the biting. Here's what her nails looked like before:


At this point, Christina hadn't started her nail regime. She had me paint her nails just to deter her from biting them. I told her to just moisturize, moisturize, moisturize! A week or so later (week 2), we got down to brass tacks. I pushed back & trimmed her cuticles & I gave her her first "nail rehab" manicure. :)


Unfortunately, I didn't take a picture of Christina's bare nails for week 3, but here's the manicure.


Week 4 & she was starting to show just the teensiest bit of length, not much but it counts!


I liked the way Christina's nails looked so much that I decided to do mine the same haha

Hehe, aren't we cute? :P
We're now in the middle of week 5 & Christina's nails look absolutely fantastic!!!! I'm so proud! <3 She's gained so much length & the skin around her nails is getting better! Yay!!


Whew! That was a whole lot of updates haha! I'll try to make a weekly or bi-weekly update so it doesn't get all crammed together like this. Which would you prefer, weekly or bi-weekly? Let me know in the comments :)

Mad Props Monday, My Manis & More!

Well, I'm still figuring out this whole blogging thing so bear with me :)
This post is probably going to be a lengthy one because I've got lots of stuff to put in it :)

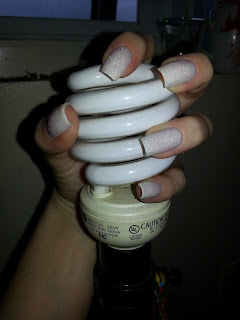
I'll start off with MPM (Mad Props Monday). One of the ladies that I follow on Instagram, Amy @indie500nails, came up with this awesome idea. Basically on Mondays we all take pictures of our nails holding random props, tag Amy and #madpropsmonday & upload them to our Instagrams. I believe it's also a sort of monthly contest, which is awesome! I love seeing all the random props people come up with.

Here are a few of my mad props:


So those were from the first week (back when I was still MsMac613 lol) which is why they're not watermarked. Just because this is, like, one of my absolute favourite manicures, I'm going to upload my favourite picture of it <3


These nails are damn near perfect!!!

Here are some other MPM pictures :)


Ok, now that that's out of the way, here's the original pictures of the manicures I did, including ones that weren't taken for MPM:

3 coats of Pure Ice in Shell Pink with 2 coats of China Glaze Fairy Dust
2 coats of Pure Ice in Home Run with nail sprinkles
Simple French tips with a twist
2 coats of Sally Hansen Violet Voltage with 2 coats of Milani 3D Holographic in Hi-Res
With striping tape & hand drawn heart added
Striping tape fell off, added glitter (NOPI One Less Lonely Glitter)


That last manicure was my first time using striping tape. I didn't find it too difficult to deal with, but even with top coat on, the tape didn't last very long. So what do we do when the tips of our nails look like crap?? Add glitter, of course! Glitter makes everything better!! I got really annoyed with how crappy my nails looked even after the glitter, so I redid my nails but kept the accent nail. 

2 coats of China Glaze Texture in Unrefined

First time using a textured polish. I really like the look of it but I couldn't stand the gritty feeling. My nails kept scraping against each other & it gave me the weirdest feeling in my tummy (odd, I know). It felt like I was accidentally scraping my nails on a brick wall or 80 grit sandpaper, so I put top coat on instead of having to take it all off.

Unrefined with 2 coats of top coat
I know, it looks terrible haha!
So, I'm going to end this post here. I don't want to bore you all to death ^.^ Let me know what you thought of my props :)